Like their counterparts in the real world, computer criminals are always looking for vulnerabilities they can exploit. Instead of an open window or unattended wallet, malware purveyors watch for holes in software that allow them to install their spying and stealing payloads onto the computers of unsuspecting users.
As the most recent Volume 14 of the Microsoft Security Intelligence Report indicates, browsers have become the favorite target of computer crooks. In the last quarter of 2012, JavaScript and HTML were the most likely source of computer infections, according to statistics gleaned by the company from its Malicious Software Removal Tool.
Otherwise-trustworthy sites can sometimes host malware that infects your machine simply by opening a Web page. That’s why the most effective way to prevent a malware infection is to use a real-time anti-malware scanner, such as Microsoft’s free Windows Defender. The program is available for Windows XP, 2003, and Vista. It is built into Windows 7 and Windows 8 and RT.
Almost as important is to require permission for JavaScript to run by using a browser extension such as Giorgio Maoni’s free NoScript for Firefox (the developer accepts donations) and Optimal Cycling’s NotScripts for Google Chrome. Unfortunately, there is no equivalent JavaScript control for Internet Explorer. Setting IE to block scripts or prompt to allow them is impractical, which is ironic considering Microsoft’s own advice to beware of sites hosting malicious scripts.
You can also protect your privacy by disabling third-party cookies and deleting your history when you exit. Unfortunately, there remains no reliable way to prevent sites and advertisers from collecting information about your Web activities, which renders your browser’s do-not-track option useless.
Allow scripting on a site-by-site basis in Firefox and Chrome
In a post from October 2012 I described how to disable Java in IE, Firefox, Chrome, and Safari. The instructions in that article for IE 9 apply to version 10 of Microsoft’s browser, although IE 10 doesn’t include Java by default; you have to visit java.com to download and install the add-on. In fact, the latest versions of Firefox and Chrome also lack Java in their default configurations.
The earlier post stated that if you keep your browsers up-to-date, JavaScript was probably safe to run. Now security experts recommend that you allow JavaScript to run only on the sites you trust. Many popular sites rely on JavaScript, and configuring your browser to allow scripting only on approved sites takes an effort.
To disable JavaScript in Firefox, click Tools > Options > Content and uncheck Enable JavaScript. (You may need to press the Alt key to show Firefox’s menu bar on which the Tools menu appears, or right-click the toolbar and check Menu Bar.) The Advanced JavaScript options control the type of actions scripts can take, not whether they run at all.
When you disable JavaScript in Firefox, sites essentially break. Firefox offers no easy way to create a list of exceptions for the sites you trust to run the scripts. A better solution is to useNoScript.
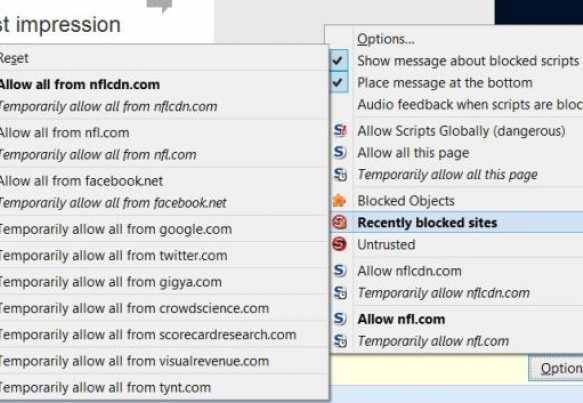
After you install NoScript and restart Firefox, the program’s icon appears in the bottom-right corner of the browser window. When you visit a site for the first time, a text box is displayed at the bottom of the screen indicating that scripts are forbidden.

The NoScript extension for Firefox blocks a page’s scripts from running until you grant permission.
(Credit: Screenshot by Dennis O’Reilly/CNET)
Click the Options button on the right side of the text box to allow some or all scripts on the page, and to view blocked sites.
NoScript lets you decide which scripts to run on each page you open in Firefox.
(Credit: Screenshot by Dennis O’Reilly/CNET)
When you first start using NoScript, the process of allowing trustworthy sites to run scripts can be tedious. After a couple of days, the interruptions dwindle. You also soon realize you can get what you need from many sites without having to enable scripting.
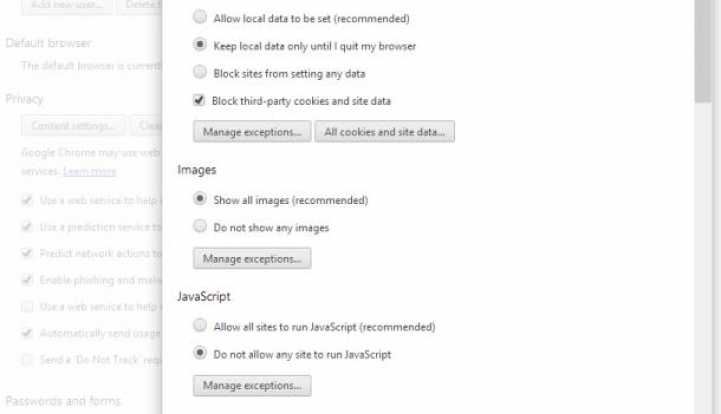
Chrome makes it much easier to allow scripts to run on a site-by-site basis. To disable JavaScript in Chrome, click the settings icon in the top-right corner, choose Settings, scroll to and select “Show advanced settings,” click the “Content settings” button under Privacy, and choose “Do not allow any site to run JavaScript.”
Disable JavaScript in Chrome via the “Content settings” dialog.
(Credit: Screenshot by Dennis O’Reilly/CNET)
When you open a page whose scripts have been blocked, a scroll icon with a red X appears on the right side of the address bar. Click it to allow scripts on the page or open the browser’s JavaScript exceptions list.
Allow scripts on a page-by-page basis by clicking the scroll icon on the right side of Chrome’s address bar.
(Credit: Screenshot by Dennis O’Reilly/CNET)
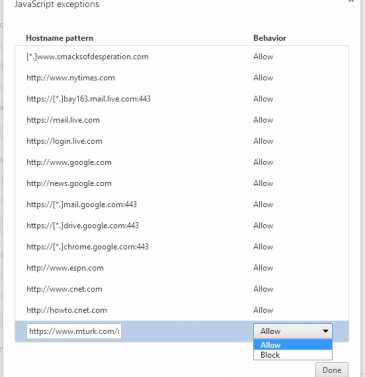
In Chrome’s JavaScript exceptions list, paste the site you wish to allow in the text box and click Done.
Chrome’s JavaScript exceptions list lets you add the sites on which scripts will run.
(Credit: Screenshot by Dennis O’Reilly/CNET)
The free NotScripts Chrome extension allows you to select which scripts to allow and which to block on each page you visit, although the program doesn’t offer the range of scripting controls available in NoScript. The Optimal Cycling site explains the add-on’s limitations compared to NoScript. In a nutshell, Firefox and Chrome use fundamentally different designs, and Google may not be as forthcoming or cooperative as Mozilla.
One way NoScript and NotScripts differ is that NoScript requires that JavaScript be enabled in Firefox, while NotScripts works only when Chrome’s JavaScript option is disabled. You also have to enter a password in the extension before it will work, as described on the Optimal Computing site.
Once the password is entered, a pyramid icon appears on the right side of Chrome’s address bar. Click it to view a list of the scripts the extension has blocked and allowed on the current page. You can block or allow individual scripts or all on the page permanently or temporarily.
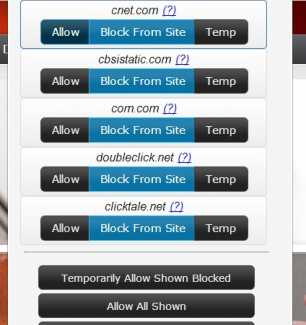
The NotScripts extension for Google Chrome lists the scripts that have been blocked and allowed on the current page.
(Credit: Screenshot by Dennis O’Reilly/CNET)
Once some or all scripts on the page have been allowed, a green box appears on the pyramid icon. You can also access the extension’s options and the vendor’s home page from the drop-down menu. (Note that the Optimal Computing site opened very slowly when I tested NotScripts. As with most free programs, don’t expect much support from the developer.)
Disable third-party cookies and delete history on exit
By default, Firefox, Chrome, and Internet Explorer allow third-party cookies to be saved on your computer and also save your browser’s history. Both settings are potential threats to your privacy. Fortunately, changing these settings in the three browsers takes less than a minute.
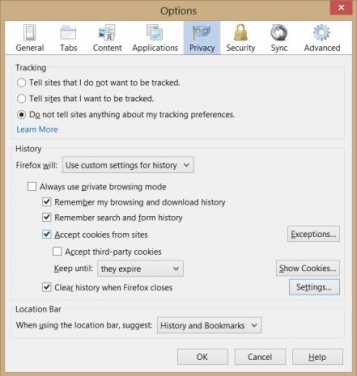
To do so in Firefox, click Tools > Options > Privacy and choose “Use custom settings for history” in the drop-down menu under History. In the options that appear, uncheck “Accept third-party cookies” and check “Clear history when Firefox closes.”
Change Firefox’s privacy settings to block third-party cookies and clear history when the program closes.
(Credit: Screenshot by Dennis O’Reilly/CNET)
To put a finer point on your privacy settings, click the Settings button and make your choices.
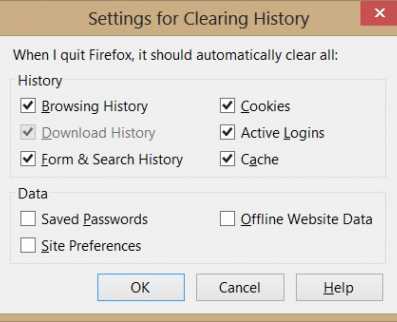
Firefox’s settings for clearing history allow you to decide the information you want the browser to retain and to delete.
(Credit: Screenshot by Dennis O’Reilly/CNET)
To block third-party cookies and delete history on exit in Chrome, click the options icon in the top-right corner of the browser window, choose Settings, select “Show advanced settings” at the bottom of the screen, click “Content settings,” choose “Keep local data until I quit my browser,” and check “Block third-party cookies and site data.”
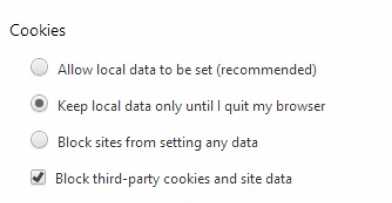
Chrome’s content settings include options for deleting local data when you quit the browser and for blocking third-party cookies.
(Credit: Screenshot by Dennis O’Reilly/CNET)
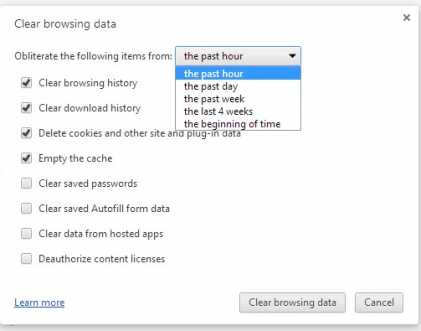
To clear Chrome’s browsing data right away, click the options icon and choose Tools > Clear browsing data (or press Ctrl-Shift-Del). Make your selections and click the “Clear browsing data button.”
Chrome’s “Clear browsing data” options let you decide the type of data to delete and how far back the deletions should extend.
(Credit: Screenshot by Dennis O’Reilly/CNET)
Set Internet Explorer to delete your history each time you close the browser by clicking the gear icon in the top-right corner of the browser and choosing Internet Options. On the General tab, check “Delete browsing history on exit.” This setting affects temporary files, history, cookies, saved passwords, and the data you enter in Web forms.
Block third-party cookies by choosing the Privacy tab in the Internet Options dialog. Click the Advanced button under Settings, check “Override automatic cookie handling,” select Block under Third-party Cookies, and click OK twice.
Shodan: The scariest search engine on the Internet
Dark Web: how to access, risks and contents
Internet Explorer’s option to block third-party cookies is accessed via the Advanced Privacy Settings dialog.
(Credit: Screenshot by Dennis O’Reilly/CNET)
Can you trust your browser’s “do not track” setting?
All three browsers now include the option to send a message to sites indicating that you don’t want them to track you. Unfortunately, there’s no assurance the sites receiving this information will honor your request. I will gladly sidestep the debate raging between privacy advocates, online advertisers, and browser developers. Lee Matthews examines the current state of browser do-not-track settings in an article on Geek.com.
Until a trustworthy do-not-track option is available, I’ll stick with blocking third-party cookies and deleting my browser history each time the program closes. If you’d rather send the sites you visit a “please don’t track me” message, follow these steps:
In Chrome, click the options icon in the top-right corner of the browser window, choose Settings, and select “Show advanced settings.” Under Privacy, click “Send a ‘Do Not Track’ request with your browsing traffic.”
In Internet Explorer 10, the do-not-track option is on by default in Windows 7 and 8. Unfortunately, the setting is being ignored, as Dante D’Orazio reported last October on The Verge.
To access IE’s do-not-track option, click the gear icon in the top-right corner of the browser window, select Internet Options > Advanced, and scroll to the Security section. There you will find the option to “Always send Do Not Track header” checked by default. To enable IE’s tracking protection, click the gear icon, choose Safety > Tracking Protection, and select Enable. Note that you’ll also have to choose a tracking-protection list or create one yourself.
Last week Susan Fulton examined the lack of progress toward a single do-not-track standard in an article on the American Civil Liberties Union site. Since there’s no guarantee any browser’s do-not-track setting will prevent sites from tracking you, there’s currently no point in enabling the feature


